かなり動きが有るので、すぐに陳腐化してしまうと思われるが、今日現在は下記の方法で動作を確認しています。
cordova pluginを作る環境は、以下の通りです。下記のファイルを準備すればionicからnativeのモジュールを呼び出すことが出来ます。
wewi-plugin-sampleそれでは、順番にファイルを作成して行きます。
├── package.json
├── plugin.xml
├── src
│ ├── android
│ │ └── Sample.java
│ └── ios
│ ├── Sample.h
│ └── Sample.m
└── www
└── sample.js
1.package.jsonの作成
{package.jsonが無いと、インストール時にエラーが発生します。
"name": "wewi-plugin-sample",
"version": "1.0.0",
"cordova": {
"id": "wewi-plugin-sample",
"platforms": [
"android",
"ios"
]
},
"description": "A starting point for a Cordova Plugin",
"dependencies": {
"gulp": "^3.9.1"
}
}
2.plugin.xmlの作成
<?xml version="1.0" encoding="UTF-8"?>nameは、plugin lsで一覧表示する際に表示されます。clobbers target="Sample"が、呼び出される名前になります。
<plugin xmlns="http://apache.org/cordova/ns/plugins/1.0"
id="wewi-plugin-sample"
version="0.1.0">
<!-- 名前はlsで表示される -->
<name>WeWiPluginSample</name>
<description>Wewi Sample Plugin</description>
<license>MIT</license>
<js-module src="www/sample.js" name="sample">
<!-- 呼び出す時の名前 -->
<clobbers target="Sample" />
</js-module>
<!-- iOS -->
<platform name="ios">
<config-file target="config.xml" parent="/*">
<feature name="Sample">
<param name="ios-package" value="Sample" onload="true" />
</feature>
</config-file>
<!-- header と source定義 -->
<header-file src="src/ios/Sample.h" />
<source-file src="src/ios/Sample.m" />
</platform>
<!-- Android -->
<platform name="android">
<config-file target="res/xml/config.xml" parent="/*">
<feature name="Sample">
<param name="android-package" value="jp.w2corp.Sample"/>
<param name="onload" value="true" />
</feature>
</config-file>
<!-- source定義(ソースの設置場所を指定) -->
<source-file src="src/android/Sample.java" target-dir="src/jp/w2corp/Sample/" />
</platform>
</plugin>
> cordova plugin ls
wewi-plugin-sample 0.1.0 "WeWiPluginSample"
3.srcの作成
今回は、helloというメソッドを呼び出すと、引数を受け取り文字列を返す簡単なものになっています。
iOSのソース>>
Sample.h
#import
@interface Sample : CDVPlugin {
}
// plugin機能の宣言
- (void) hello:(CDVInvokedUrlCommand*)command;
@end
Sample.m
#import "Sample.h"androidのソース>>
#import
@implementation Sample
- (void)pluginInitialize {}
- (void)hello:(CDVInvokedUrlCommand*)command
{
NSString* name = [[command arguments] objectAtIndex:0];
NSString* msg = [NSString stringWithFormat: @"Hello, %@", name];
CDVPluginResult* result = [CDVPluginResult
resultWithStatus:CDVCommandStatus_OK
messageAsString:msg];
[self.commandDelegate sendPluginResult:result callbackId:command.callbackId];
}
@end
Sample.java
package jp.w2corp;
import org.apache.cordova.CallbackContext;
import org.apache.cordova.CordovaInterface;
import org.apache.cordova.CordovaPlugin;
import org.apache.cordova.CordovaWebView;
import org.apache.cordova.PluginResult;
import org.apache.cordova.PluginResult.Status;
import org.json.JSONObject;
import org.json.JSONArray;
import org.json.JSONException;
import android.util.Log;
import java.util.Date;
public class Sample extends CordovaPlugin {
private static final String TAG = "MiPlugin";
public void initialize(CordovaInterface cordova, CordovaWebView webView) {
super.initialize(cordova, webView);
Log.d(TAG, "Inicializando WeWi Plugin");
}
public boolean execute(String action, JSONArray args, final CallbackContext callbackContext) throws JSONException {
if(action.equals("hello")) {
// An example of returning data back to the web layer
String phrase = args.getString(0);
// Echo back the first argument
final PluginResult result = new PluginResult(PluginResult.Status.OK, "Hola todo el... "+phrase);
callbackContext.sendPluginResult(result);
}
return true;
}
}
4.呼び出されるjavascriptの作成
wwwの配下に、ionicから呼び出されるjsファイルを作成します。
sample.js
var exec = require('cordova/exec');定数やfunctionを 連想配列に入れてexportします。nativeのメソッドを呼び出すには、cordova/execを呼び出します。各パラメータは、下記の通りです。
var PLUGIN_NAME = 'Sample';
var values = {
hello: function (name, successCallback, errorCallback){
console.log("Sample.hello() was called!");
exec(successCallback, errorCallback, PLUGIN_NAME, "hello", [name]);
}
};
module.exports = values ;
・
function(winParam) {}: 成功コールバック関数。 ・
function(error) {}エラー ・ コールバック関数。 ・
"service": をネイティブ側で呼び出すサービス名。 ・
"action": をネイティブ側で呼び出すアクション名。 ・
[/* arguments */]: ネイティブ環境に渡す引数の配列。 5.pluginのinstall
出来上がったpluginをinstallして使ってみます。
下記のコマンド使ってinstallします。
$ ionic cordova plugin add plugins-dev/wewi-plugin-sample
pluginを修正した際には、削除して再度installします。削除する際には、下記の通りidで削除します。ディレクトリは不要です。
$ ionic cordova plugin rm wewi-plugin-sampleまた、プラグインのpackage.jsonのnameを間違った場合や変更した場合には、npm コマンドでアンインストールする必要があります。
6.ionicから読んでみる
ionicからは、
ionViewDidLoad() {
// platformの準備を確認する
this.platform.ready().then(() => {
console.log((window).cordova);
(<any>window).Sample.hello('Tsubaki!!!', this.successCallback, this.errorCallback); });
}
//成功時の処理
successCallback(message){ alert(message); }
//エラー時の処理
errorCallback(){ alert("hello error"); }
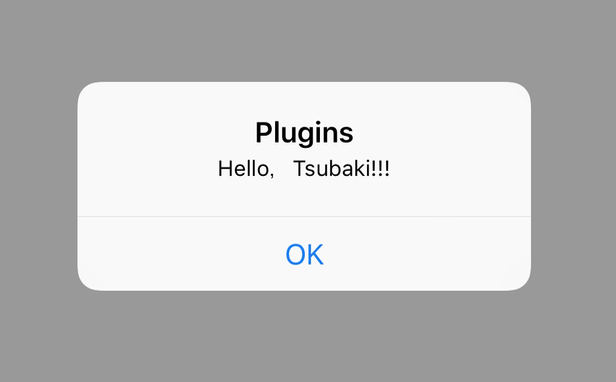
これを実行すると、下記の通りテキストが表示されました。

なお、Samplenオブジェクトがnot foundになる場合には、pluginがうまく読み込まれていない事が考えられますので、Cordovaオブジェクトの中身を確認して下さい。
Cordovaオブジェクトの、define/moduleMapに以下の様に入っていれば大丈夫なはずです・・・


